Showing posts with label diy. Show all posts

Friday, April 18, 2014

Last Minute Easter Banner using my Sihlouette Cameo

Hello there, little loves!  

Can you believe it's already Easter weekend??  Seriously though, folks, why is this year in super-speed mode?!  At any rate, here I am with only a couple days to spare and realizing I'm not really accomplishing the whole being that "decorates for every holiday" mom that I had always hoped to be.  Lucky for me, my darling husband got me a Silhouette Cameo for Christmas.  So last night I whipped up an adorable little bunny bunting banner with my girlies.  Any basic bunny shape would do the trick here, but having a Cricut or a Silhouette sure does make it easy :)


<
I cut out 12 of the design "Bunny Doll" by Sophie Gallow.  

I did not use the eyes, nose, or inner ears, just the body.  I sized them up to fit 2 per one Letter sized paper.  Then my littlest chickadee and I applied self-adhesive googly eyes and drew in noses and smiles (and eyelashes just because!).  Lastly, I glued simple text (size 144 font) to spell out Happy Easter (with a blank in between) on the tummies of the bunnies.

The easiest-total cheater move-of the project is that we literally just bent over all their ears and hung them across a fun confetti yarn!  You could do this with any bunny!

Monday, February 17, 2014

Magazine and Markers Art

So happy President's Day!  We've got big sis home from school today and even though the sun is shining, it is ridiculously windy out, so we've been inside all day.
  
As of late, I've had too high-yielding little artists, so these chicas would be happy to fall into their regular routine of mass producing marker/crayon pictures.  But today we jazzed it up a little by mixing in some magazine cut-outs as a jumping-off point and WOWZA did that create a thrill (I'm trying to soak in these moments where they're so easy to impress)!!  So file this away under rainy day or time-filler activities, mamas.  All you need are a couple fun faces/heads cut out from magazines and let your littles do the rest!


My girls literally spent hours creating these master-pieces and I've been inspired to keep a small stash of pre-cut heads/pics for them to access any time they need a little artsy inspiration!

Tuesday, November 19, 2013

Pinterest Inspired Pine Cone Wreath

Okay, so we interrupt the Christmas frenzy currently going on in my head:


 ... to bring you this awesome fall wreath project.  A week or two ago, my awesome friend, The Beekeeper's Wife, pinned this amazing pine cone wreath:


Which I quickly re-pinned only to find no tutorial, just beautiful pictures.  So after some major pinterest sleuthing I came up a little short on the how-to and decided to just dive in (this attitude does not often produce successful crafting!!).  

I clean my dad's business office in the early mornings and I have many a time noticed the treasure trove of pine cones littering the pine-tree lined parking lot.  So the other day I armed myself with an empty computer paper box, and climbed up onto the retaining wall and began inspecting and collecting a surplus of these nature gems :)  Dressed in my ratty, bleach-stained cleaning clothes, I'm sure I looked quite curious as I excitedly held each treasure up making sure the bottoms were pretty!!!  I don't fill my look-like-a-crazy-lady-card every day but this day I managed to before 8 am!

The wreath form I got was $5 from Walmart and was foam but the smooth shiny foam, not the scratchy disintegrate-y kind.  I mention this because I spray-painted mine brown first and you can't spray paint the other kind of foam, it just melts (I've learned from experience!).  

The most tedious part would be cutting the pine cones in half.  I did that because the inspiration picture is pretty much focused on the bottoms of the pine cones which--btw--are totally beautiful, why have I not noticed that before??  Plus, cutting them results in a nice flatish area to apply heaps of hot glue.  I used garden clippers and it was a pain!  The whole time I kept thinking how much easier it would be with a small hand saw that could just saw them down.  I probably would have saved lots of time if I just stopped and went to rummage in the garage to find one, but I was too lazy to do that which--in turn--meant I did things the harder/longer way (doesn't make any sense I know!)

I got to write these jokes. So, I sit at the hotel at night and I think of something that's funny. Or, If the pen is too far away, I have to convince myself that what I thought of wasn't funny.
Mitch Hedberg

Then I got my hot glue on, only suffered a few minor burns (I keep wondering why I can't learn to not grasp the falling item that is coated in hot glue I-myself-just put there!!!)


Much to my surprise it worked!!  I was skeptical the hot glue would hold those little guys to the foam form but it totally did!  (granted I used about half a glue stick per cone).  I worked the whole wreath with it lying flat so the back is bare and will lay nicely against the door.  I mixed in a couple "whole" cones (which really I cut off the side to make flat).  The whole project took me only about an hour and 45 minutes not bad by crafting standards!

Here's how it turned out:  

I'm hoping to get all Thanksgiving-y up in here as I'm hosting a pretty big group!  This would be easier if I could pull myself away from those darn Hallmark Christmas movies and my pandora Christmas station.  At any rate, maybe another fall-esque project or two may pop up here, be on the lookout!  

Hope your week is going lovely! ♥

Monday, January 28, 2013

An Un-Valentine Gift ;) DIY

Now, I totally have some romantic, Valentine-y handmades in the works.  However, before we get to them, I wanted to throw in an "Un-Valentine" gift for those who might not be feeling the ooey-gooey, lovey doveiness of it all :)  Because, who hasn't been there :)  


This is a variation of the potty pops block I posted about last year.  

Here's how I made it:
All you need is a scrap piece of 2"x4" (oh, and also, awesome fyi: if you go the the scrap section of Home Depot they might have some scrap pieces in random lengths, I got several almost 4' lengths of both 2x4 & 1x3 for only 50 cents a board!!), some paints, a drill, and some suckers :)  The paints I used were Martha Stewart Craft Paints in Glossy Beach Glass & Metallic Gold.

I used the font "cream puff" to print out my lettering just on regular computer paper.  Then, taped it over my painted block and traced along the outside of the letters pressing down hard with a pen.  Once the paper is removed, I painted in the indentation with gold.

Depending on the size of your block you can mark where and how many holes you want for suckers along the top.  I didn't drill as horribly crooked as it appears, I merely used too big of a bit so they're leaning against the edge (a look I kinda like :)).

You can sand the block to give it a weathered look and spray with a glossy clear coat for longevity.

Don't share this cynical sentiment but like the pun?  Just add a doesn't into the phrase :)  (maybe even on the back of the block making it reversible for the fickle ;)

Wednesday, January 25, 2012

Potty Pop Block: in which I actually make something I pinned :)

a couple of days ago I saw this amazing idea over at Mom Vs. Design School Source momvsdesignschool.blogspot.com
pinned it and then actually made it!! Hooray (the ratio of pins to actual crafting is severely unbalanced!!)

Now, I'm banking on that whole "the second child will do it sooner because they want to be like the older" thing in terms of potty training baby number 2. I know we're not quite there yet, but she is having fun sitting on the little potty (fully clothed, but whatever!), so I think it's not too far off. We had a bag of M&Ms for Y, but this is WAY cuter!

Also, I'm still crafting my way to the bottom of a box of 2x4 scraps and I thought why not make one of these for the bathroom.

So, here's my version of this genius mama's brilliant idea:


What I used:

Scrap chunk of wood
Paint
sand paper
drill
printed text
Clear Gloss coat

1) I simply painted the whole block one solid color

2) While it was drying, I printed out the text in my favorite of favorites font: Cream Puff. I used narrow margins and size 180 font on a landscape page. But you can just size it to fit your block.

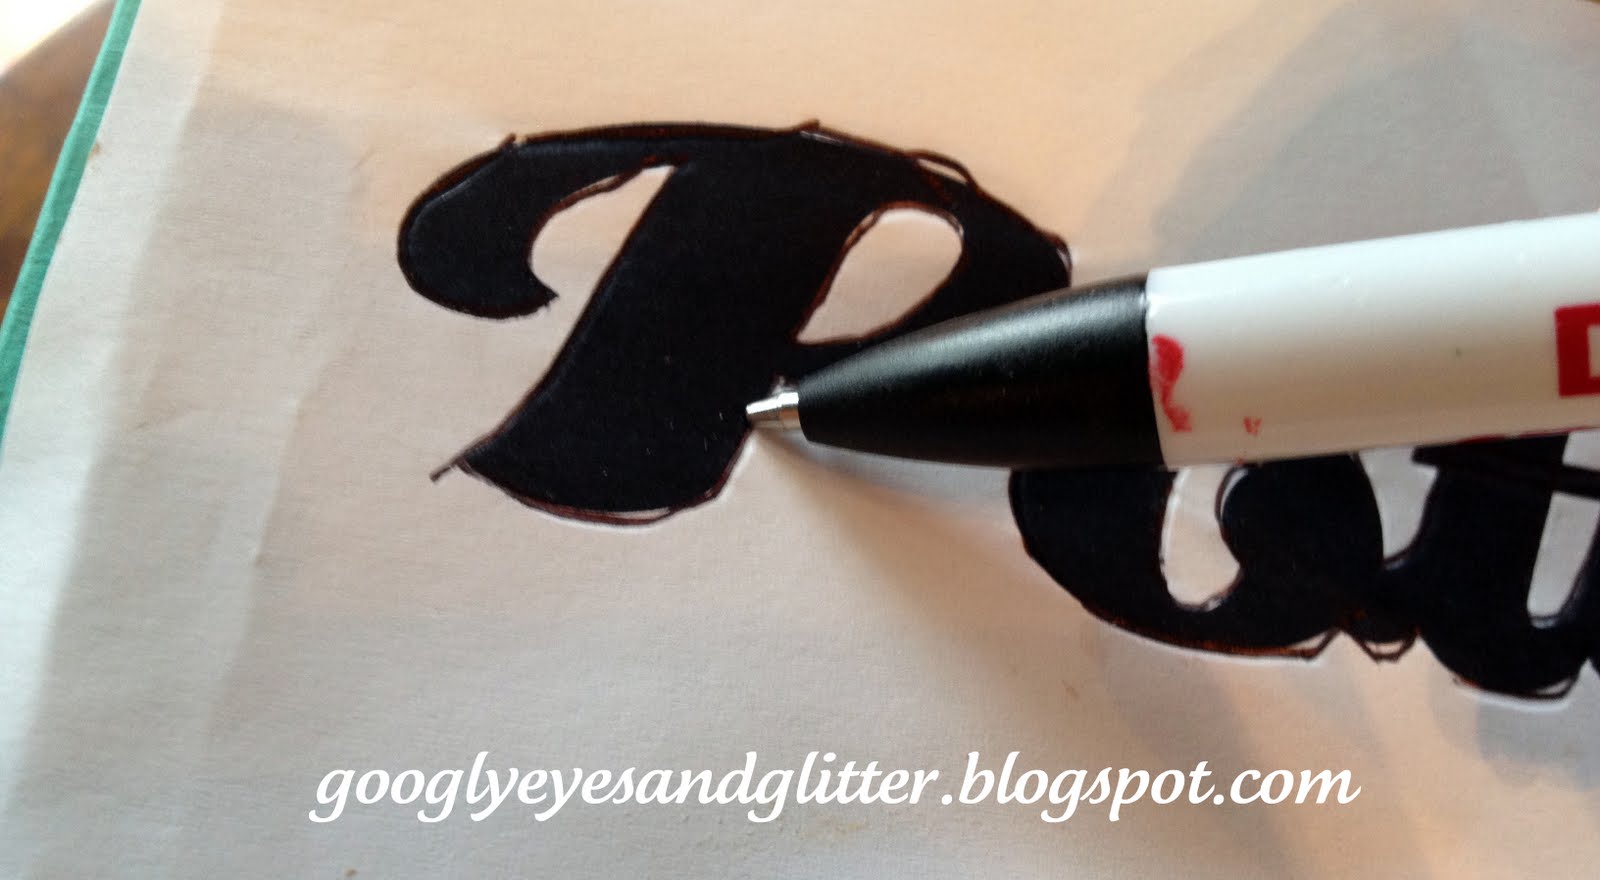
3) This is my new favorite trick for painting on cute text! I positioned the paper over the block so that the text would be where I want it and simply traced the outline with a pen (although anything sharp-ish will do), all the time pressing down enough to leave an imprint in the wood. You'll see in my picture it's kinda hard to stay right in the lines if you have a particularly bumpy piece of wood . . . my hands aren't that unsteady, but you can correct and smooth out your lines when you're actually painting.


4) Remove the paper and with a fine brush or (better yet) a paint pen, trace the imprinted outline of the text and then paint it in!

5) Distress it! I'm totally into making weathered/distressed things when it comes to painting/stenciling. It's not so much that that's my style, as much as it is that it covers a multitude of imperfections! Really, you can be as sloppy as you want and just sandpaper it a little bit and wrap it up with a great big: I meant to do that!
So Sand edges, hit it with hammers, throw it on the sidewalk . . . go for it!

6) Drill holes in the top for your pops

7) Spray with a clear coat (i like glossy things!)

8) once completely completely dry, add pops and plop that baby on top of your potty :)
Pin It

I think it turned out totally cute! And I'm sure Y(3) will revert to needing a reward for going potty once I place this in the bathroom, but that's okay, maybe it will help little sister follow suit!

I'm linking up with Somewhat Simple & Finding My Way In Texas

Friday, December 23, 2011

DIY Bedford Falls Sign


It's a Wonderful Life is a commitment, I admit it. It's a really long movie, but oh man is it incredible. I love it. I love George Bailey, I love Bedford Falls, I love everything about it. When I was younger and still living at home, my little brother and I would watch it on repeat until we fell asleep Christmas Eve. Just when I'd think he was asleep he'd go "hee haw" and we'd burst into laughter.

I've been wanting to make my own "YOU ARE NOW IN BEDFORD FALLS" sign for years and just never got around to it. Leave it to me to wait until I have two kids running around to think NOW is the time ;) Wanna make one too?


Supplies:
1" x 8" Pine Board (sold at Home Depot in 6' length, for about $15)
Ivory Spray Paint ($5)
Paint Pen in Black ($4)
Picture Hangers ($1)
Saw
(router for optional edge)

  1. Print the text "YOU ARE NOW IN BEDFORD FALLS" in a font and size that works (I used a font called Enge Holzschrift in font size425).
  2. Layout text papers on your board to see how long you need the board to be and cut it to that length.
  3. If you want to, you can cut off the corners and/or router the edges of the board
  4. Lay the text pages back onto the board how you want them and tape them down.
  5. Using a pen or other semi-sharp object trace around the outer edge of each letter pressing down enough to leave an indent in the painted board.
  6. Remove paper and use the paint pen to trace along your indent marks, then use paint and a paint brush to fill in the letters.
  7. Add a couple of picture hangers on the back of the board. (you'll note in my pictures that I: a) did not cut my board before I painted it, so the edges are unpainted; b)did not attach my hangers yet so mine is merely sitting on the table.)


Total Project Cost: $25
Time: approx 2 hrs
I love it!

LinkWithin

Related Posts Plugin for WordPress, Blogger...